Here we
will learn how to use Jquery in Asp.net
MVC and we will create a DateTime picker using Jquery.
Open visual
studio and create a new project an select a MVC4 application then you select a
“Internet application and click OK

If you want
to use Empty instead of internet application then you need to add some Jquery
script and css these jquery script is available when we create project using
internet application.
You can
copy these Content and script folder from this internet application and put it
in empty template project.

Step(1):- Go
to Sql Server management system and execute following script.
create database MVCVariousAttribute
use MVCVariousAttribute
Create table Student
(
Id int primary key identity,
FullName nvarchar(100),
Gender nvarchar(10),
Age int,
AdmissionDate DateTime,
EmailAddress nvarchar(100),
WinningPrize int,
PersonalWebSite nvarchar(100)
)
Insert into Student values
('Munesh Sharma', 'Male', 25, '2005-05-05
16:53:36.975', 'Munesh@gmail.com', 45000,'http://dotnet-munesh.blogspot.in/')
Insert into Student values
('Rahul Sharma', NULL, 30, '2006-06-06
17:42:25.865', 'Rahul@gmail.com', 35000,'http://dotnet-munesh.blogspot.in/')
|
Step(2):- Go to Visual studio and add
a new project -> Select “Asp.Net MVC4 Web Application” and give
the name for this ,In my case it is “JqueryCalendar” ->
Select a Project template as Empty and View engine is “Razor”, Then
Click OK
Step(3):- Add “EntityFramework dll” to reference folder in
your project if you don’t have then install it through nugget package manager
for more go this Go here.
Step(4):- Right click on Model folder
and add “Ado.net entity Data Model” and give the name it as “StudentDataModel”,
Then click on Add
Step(5): . When You
will click Add button here you will see another window for “EntityData
modal Wizard” from there you select “Generate From DataBase”, And Click
Next.
Give the connection name and select
your database then click on next

Step(6) . In this
screen select your Database Tables and give Modal Name then click FINISH
Button.


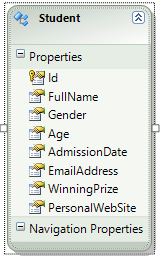
When you will
click on finish button it will create Student Entity.
Step(7):- Now at this position go to
controller folder -> right click on this folder and add a controller with
the name “CalendarController”, It will create a Calendar controller , write the
following code on this page.

using System;
using System.Collections.Generic;
using System.Linq;
using System.Web;
using System.Web.Mvc;
using JqueryCalendar.Models;
namespace JqueryCalendar.Controllers
{
public class HomeController : Controller
{
public ActionResult Details(int id)
{
MVCVariousAttributeEntities _context
= new MVCVariousAttributeEntities();
Student _studentDetail
= _context.Students.Where(c => c.Id == id).SingleOrDefault();
return View(_studentDetail);
}
//
// GET: /Home/Create
public ActionResult Create()
{
return View();
}
//
// POST:
/Home/Create
[HttpPost]
public ActionResult Create(FormCollection collection)
{
try
{
// TODO:
Add insert logic here
return RedirectToAction("Index");
}
catch
{
return View();
}
}
//
// GET:
/Home/Edit/5
public ActionResult Edit(int id)
{
return View();
}
//
// POST:
/Home/Edit/5
[HttpPost]
public ActionResult Edit(int id, FormCollection collection)
{
try
{
// TODO:
Add update logic here
return RedirectToAction("Index");
}
catch
{
return View();
}
}
//
// GET:
/Home/Delete/5
public ActionResult Delete(int id)
{
return View();
}
//
// POST:
/Home/Delete/5
[HttpPost]
public ActionResult Delete(int id, FormCollection collection)
{
try
{
// TODO:
Add delete logic here
return RedirectToAction("Index");
}
catch
{
return View();
}
}
}
}
|
Step(8):- Next step is that add a
view for detail action method so right click on this method -> add view
-> Scaffold template as Detail

It will generate a code for Detail
view, Now run your application and redirect to the following URL
http://localhost/JqueryCalendar/Calendar/Details/1
|
It is With Home controller then
Detail action method with ID “1”
When we see this output , we see that
it is not pretty good means there is no gap in FullName other things so for
that we will use attribute.
Step(9):- When we create a application using entityFramework
we add a EntityDataModel then we gives connection and select tables that time
it create a class in model (Designer class).
Partial
this modal.edmx (student.cs class) for making some changes like design is not
looking good and for date there is no calander
This auto generated class(modal1.edmx)
is a partial class so we can create a another student partial class and we can
make changes there.
So in modal folder add a class and
give the name as “Student.cs” and write the following code in this class
using System;
using System.Collections.Generic;
using System.Linq;
using System.Web;
using System.ComponentModel.DataAnnotations;
using System.ComponentModel;
namespace JqueryCalendar.Models
{
[MetadataType(typeof(StudentMetaData))]
public partial class Student
{
}
public class StudentMetaData
{
//If you
want "FullName" to be displayed as "Full Name",
//use
DisplayAttribute or DisplayName attribute.
//[DisplayAttribute(Name="Full
Name")]
//[Display(Name
= "Full Name")]
[DisplayName("Full
Name")]
public string FullName
{ get; set; }
public DateTime?
AdmissionDate { get; set; }
// If
gender is NULL, "Gender not specified" text will be displayed.
[DisplayFormat(NullDisplayText
= "Gender not specified")]
public string Gender
{ get; set; }
//If you
don't want to display a column use ScaffoldColumn attribute.
//This
only works when you use @Html.DisplayForModel() helper
[ScaffoldColumn(false)]
public int?
WinningPrize { get; set; }
}
}
|
At this
point Run your application and go to following URl and output will be
http://localhost:43552/Calendar/Edit/1
|

Here you
will see that Admission Date text box having date and here user have to put
date manually which is not a good practice there should be a calendar so that
user can enter any date according to particular format.
The following is the
convention used by MVC to find the customized templates
1. The customized display templates must be in a sub-folder that is named -DisplayTemplates. Editor templates must be in a sub-folder that is named -EditorTemplates.
2. These sub-folders can live in "Shared" folder, or a specific views folder. If these folders are present in the Shared folder, then the templates are available for all the views. If they are in a specific views folder, then, they are available only for that set of views.
3. The name of the template must match the name of the type. For example, as we are customizing DateTime template, the name of the template in this case has to be DateTime.ascx or DateTime.cshtml.
Adding a Custom
DateTime Editor template
Step 1: If "Shared" folder does not already exists in your project(In View Folder), right click on the project in solution explorer and add it. In shared folder file is available to entire project for all the view.
Step 1: If "Shared" folder does not already exists in your project(In View Folder), right click on the project in solution explorer and add it. In shared folder file is available to entire project for all the view.
Step 2: Right click on the "Shared" folder, and add a "EditorTemplates" folder.
Step 3: Right click on "EditorTemplates" folder and add a view with name = DateTime
Step 3: Right click on "EditorTemplates" folder and add a view with name = DateTime
this view name
should match with the property type here with have property type name is DateTime
Step 4: Copy and paste the
following code in DateTime.cshtml partial view@model DateTime?
@Html.TextBox("", (Model.HasValue ? Model.Value.ToString("dd/MM/yyyy") :string.Empty), new { @class = "date" })
@Html.TextBox("", (Model.HasValue ? Model.Value.ToString("dd/MM/yyyy") :string.Empty), new { @class = "date" })
Note: Please refer to the following MSDN articel for all the DateTime format strings
http://msdn.microsoft.com/en-us/library/8kb3ddd4.aspx
Step 5: Copy and paste the following code in Edit.cshtml view
@model MVCDemo.Models.Employee
@{
ViewBag.Title = "Edit";
}
<h2>Edit</h2>
<script src="~/Scripts/jquery-1.7.1.min.js" type="text/javascript"></script>
<script src="~/Scripts/jquery-ui-1.8.20.min.js" type="text/javascript"></script>
<link href="~/Content/Site.css" rel="stylesheet" type="text/css" />
<link href="~/Content/themes/base/jquery.ui.all.css" rel="stylesheet" type="text/css" />
<script type="text/javascript">
$(function()
{
$("input:text.date").datepicker(
{
dateFormat: "dd/mm/yy"
});
});
</script>
@using (@Html.BeginForm())
{
@Html.EditorForModel()
<br />
<input type="submit" value="Save" />
}
Note: Please refer to the following jQuery link for DateTime format strings
http://jqueryui.com/resources/demos/datepicker/date-formats.html
The following jQuery scripts and css files are required for jQuery DateTime picker control. However, these files may change depending on the version of jQuery you are working with.
Scripts/jquery-1.7.1.min.js
Scripts/jquery-ui-1.8.20.min.js
Content/Site.css
Content/themes/base/jquery.ui.all.css
Now run your application you will see that datepicker at admission Date
text box

No comments:
Post a Comment